Part 2 of our Build diary and Comments from the now closed Brisbane Cyclist website, 2015.
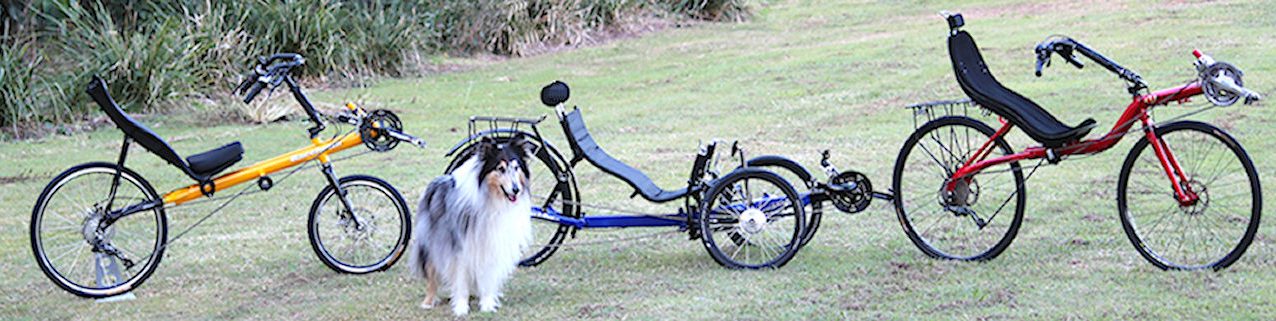
I made a rash statement yesterday about having a similar layout bike to cheat off, and that made me wonder, how similar? Not too similar I hope….

First up, the Performer Goal 26X, heavily modified. (My current wheels)

Then the CHR as it is at the moment.

Merged to see the differences.

And for giggles, compared with my road bike.
Comment by Melvyn Yap on September 27, 2015 at 11:34am: Excellent comparison, didn’t think of doing that when I built my Carbent last time, but made a mental note to use this method in my future build. I see that you’ll be seated much lower to the ground on the M5, which is a nice advantage. BB height to seat height ratio is greater too, presumably better aerodynamics.
Comment by David on September 27, 2015 at 4:22pm: Well done James. Perhaps the M5 will be more stable at warp speed with it’s longer wheelbase.
Day 7.
A day of details today. Rear derailleur on and cabled up, with an inline adjuster below the tiller. Terribly worried that I would have a brain fade and loose the cable outer into the frame….that would not be fun.


Joined up 3 lengths of chain and here I did have a brain snap. The chain tool I chose didn’t have a through hole for the shimano pin, and by applying enough force I broke that tool. Grumble grumble, and more grumble when I realised what I’d done. Used my other chain tool and all went well. Final join of the chain is with a quick link. The chain is still a couple of links long, but I know how to fix that!
I can now sit on it and pedal, and change gears at the rear. A bit more fiddling and adjusting position of the bar end shifters and I was game to finish the right handle bar. Two layers of bar tape as a grip, and I’m really cheesed there is a wrinkle in the finishing tape. Not sure how the bar ends will go on the road, ie. whether I can change gear and still ride straight is the question.


Tinkering with the chain line now. I have an idler from a derailleur and mounted it on the fork hard point, and a piece of chain tube to guide the chain down past the frame. Not really happy with this idler as it’s pretty noisy as the chain come onto the wheel. Might copy the one off the Performer and see how that goes.
The white bit in the background behind the idler is a guard to protect the frame should the chain jump off in that direction, and it also secures the top end of the chain tube. Ultimately I think I will have a second idler under the seat and no chain tube, but that is yet to come.
Comment by David on September 27, 2015 at 7:57pm: Great stuff James. It’s always a pleasure to watch a pro in action 🙂
Day 8
Unintended consequences. Ever heard that phrase before? We have an example now, the M5 rear fender and rack mount bolts to the seat, exactly where the rear mount spacers are fitted. The fender should fit between the spacers but of course doesn’t on my installation. I’ll go away and have a sulk while I think of the best way to correct it.
On the up side though, I now have a front derailleur, mounted, cabled and working. No photos, after all seen one front derailleur, seen ’em all.
Oh, and weighed it this afternoon. 8kg. Pretty happy with that. Couple of hundred grams of fender and headrest to fit, and that’s all. Mind you that was the bathroom scales so I won’t vouch for their accuracy but I tried it with the bike by itself, and with me holding the bike then just me and no real difference. We’re probably within .5 kg, lets call it 8 1/2 kg at the moment.
Comment by Melvyn Yap on September 28, 2015 at 8:44pm: Holy moly, that’s even lighter than my carbon frame road bike! What wheelset are you running, what’s their weight? Seems to me there’s still lots of potential to further reduce the weight to sub 7.5kg 🙂
Reply by JamesD on September 28, 2015 at 9:27pm: Ultegra tubeless wheels, and Ultegra 10sp 12-28 cassette, fitted with Schwalbe One 23mm tyres. There’s not much to leave off to reduce the weight further, upgrading to Dura Ace Di2 might save a bit. It will certainly lighten the wallet!
I did weigh the wheels, but more to compare them with the R500 wheel set I have as an option. They were lighter but I can’t remember the numbers.
Comment by David on September 28, 2015 at 9:34pm: I reneg on the roll down comp. You win 🙂
Comment by Melvyn Yap on September 28, 2015 at 9:44pm: The R500 wheelset is about 1.9kg. I got myself a used Dura Ace c24 wheelset for $400 which weighs 1.4kg. Relatively cheap way of reducing the weight!
Comment by David on September 28, 2015 at 8:58pm: You could always get the SpeedEZ mudguards. They can be fitted permanently to the front/rear fork. I used them on the Corsa and have the rear one on the Fujin at the moment (even though they are for 700 wheels and the Fujin is 26″ rear).
Reply by JamesD on September 28, 2015 at 9:31pm: Ultimately it will have a tail box, that was the attraction of the M5 fender/mount. I’m not beaten yet…..
If I was keen I could probably ride around the block now. Except it’s dark.
Day 10. (I think)
Not a whole lot of progress, sorting out the chain management while not difficult is tedious. Mostly because I insist on re-inventing the wheel, or in this case idlers.

New idler made for the head tube hard point, and this of course means making special bushes and spacers to suit. And for me that means making several before I get it right. Now it is done and fitted, I’ve thought of some improvements….but I think I’ll do the second one for under the seat first. When that’s done we can ride. Yeah!
Comment by Melvyn Yap on September 30, 2015 at 10:35pm: You made your own idler in your garage? I’m impressed! I’ve read that it’s normal for carbon frame recumbents to produce a low frequency grinding hum while pedaling. I certainly noticed that on my Carbent. But seems like the designers of Schlitter Encore managed to get rid of it, perhaps you’ve found a parallel solution as well?
Day 11
Getting close, another idler to make and then it’s final adjustments.
First grab a bit of nylon rod, chuck it in the lathe and start transforming a big bit of stuff into a smaller bit… This time I took some measurements instead of winging it, so……


And here we are with the o’ring installed and fitted on the bike.
Easy-peasy (if you have the right tools). Of course I have yet to prove that they work….
Day 12
Comment by JamesD on October 2, 2015 at 4:09pm: Just had a quick ride around the block – nice. Run out of time for today, so more playing tomorrow afternoon.
First impression – super stable, accelerates quickly. Stiff.
Happy happy!
Reply by Melvyn Yap on October 2, 2015 at 4:14pm: Fantastic! Wait what… tomorrow afternoon?? you mean you’re not riding this for the group ride? 🙁
Reply by JamesD on October 2, 2015 at 5:01pm: Tempting, but no. I’ve no provision yet for water, tools etc and it’s probably foolhardy to set off on an 80k ride having done 200 meters testing.
But still tempting!
Day…whatever, I’ve lost count…
October 5, 2015
I did a quick 30k around Redcliffe this morning – not too far in case I had to invest in a long walk home…. I had an issue with the sliding boom ummm…..sliding, and making loud “I’m loose” carbony type noises. Not really a problem, more disconcerting than anything. Took it a bit easier for the final 10k.
First impressions? (Yeah, I know they’re second first impressions – the other ones don’t count!) The bike is stiff, stable, and fast. It’s very similar in layout to the Performer, so it really posed no problem for me as far as riding. I could see how going from a more upright bike with a lower bottom bracket could be challenging though.
Slow speed is OK, as long as you’re not trying to go around corners. It is more prone to foot strike on the front wheel than the Performer, and I managed to get my heel stuck between the wheel and the boom. That was exciting!
The 2 idlers on the return chain are worthwhile I think. A lot of M5’s are run with the return chain “dropped”, where it goes directly from the chainwheel to the rear derailleur and severely limits the front wheel turning angle. Apparently you get used to it but I think practicality wins in this case.
The brakes have turned out OK too. Not as powerful as disc, but adequate.
Bar end shifters are interesting, initially I had a challenge changing gears without making a steering input too, this improved with practise and I think will be a non-event soon. I still have to think which way to move ’em.
Compact crank with the 12-28 cassette has been good so far, but Redcliffe doesn’t do steep hills. Climbing was noticeably easier.
Fast? Yes. According to Strava, I took 50sec of my PB on one 6 minute segment, and 10 sec off a 3 minute climb. I’m fairly sure the previous times would have been tailwind assisted….
Still things to do on the bike, mostly with carrying gear. The temp location for the drink bottle is not ideal, my legs just touch the front end of the bottle. However, it does remind me about turning too tight and pedalling.
Overall – happy camper here!
October 28, 2015
We must be getting very near the end of the project – certainly getting near the end of the money that’s for sure!
Storage has been a question for a while, I borrowed a Bacchetta “One for All” bag to let me carry essentials and while it worked it was not a particularly good fit on the seat. Offering up another borrowed Bacchetta Brain Box bag looked more promising but it needed modification to make it fit, and I really couldn’t do that to a borrowed bag. So, an order to Bacchetta (nicely swelled by friends piggy backing on the postage) and the bag has arrived. Wouldn’t you guess it, the current bags have a different attachment method to the one I tried so all the thought about how to make it fit went out the window…..

Well, the bag is now on and looks good too I think. A hydration bladder slips inside and takes care of the drinking problem, and that means I can remove the bottle cage from the tiller and wrap that in bar tape. Twice. First time I went the wrong way and it didn’t look aero with the seam facing into wind.

Oh, and after all the discussions about mirrors, the mount on the brake lever works outstandingly well. Unless you have the brake on in which case you have an outstanding view of the tops of the trees behind you.
At this point I’m declaring the build done and fit for service, but I also know there will be changes and mods in the future. If so I’ll try and remember to update this entry but until then I’m going riding.
When it stops raining.
November 23, 2015
OK, I’ve been riding the M5 for a few weeks now, I think it’s a fair time to put down some ride impressions. First up, I’ll declare this will probably be a biased view….I’ve spent my money on this and I’m unlikely to tell everyone how bad it is, so take what I say with a grain of salt. Maybe a pinch, oh all right, a large pinch of salt.
First, bad points.
- Umm……
Well, if you insist then…. The CHR is not what I would call a beginners bike but then any dual 700C highracer is going to be a challenge. The CHR takes the highracer bad points and magnifies them, the front wheel and foot/pedal overlap is significant, the chain line restricts the turning circle, the fixed tiller makes entry and exit more interesting, and there is very limited storage and mounting space for accessories, tyre size is limited to 25mm (with 700C rims). Forget about mudguards, and if you like lots of accessories on the handle bars – well forget that too.
But on the other hand, ride it and all these things are forgiven.
It’s a bike that rewards commitment, no doubt about it. There’s no pussy footing about when launching from rest, commit to it with a firm pedal stroke and the bike rewards with a hug from the seat and a rush into the distance. Be tentative with a half-hearted push in the wrong gear and it’ll eat you…..the internet has enough accounts of people bearing the scars from this.
Once rolling, the steering firms up nicely but remains responsive to input, tracking straight and true unless interfered with. And there’s the rub, with the longish tiller it is very easy to put in an unwanted command, the bike will react but not in an out of control way.
Through a twisting path, the steering remains firm but responsive, the long wheelbase making itself felt at tight, slow corners. At first you feel like having to “muscle” the bike through the twisties, then it all starts to flow and you realise the bike responds really well to being “stroked” along. It’s hard to explain.
The open road/path is where it really shines. The bike whispers to you “take another gear, just one more, let’s fly” and rewards with a turn of speed that just shouldn’t be there.
I’m amazed at the way the bike carries speed, stop pedalling and it glides seemingly forever. Fortunately we have brakes, 105 caliper in this case, though I get the feeling that high speed braking is marginal – having become used to discs I do miss the power. Worth noting is that with the long wheelbase and “S” frame you can command for more braking power than a conventional road bike can apply. Tyre adhesion is the limiting factor, not the “over the handle bars” option!
The frame seems a contradiction, it feels incredibly stiff with power transmission, yet cossets with a supple ride absorbing much of the chip seal coarseness and bumps. Even the joints in concrete paths are tolerable, remembering this is with a hardshell seat without foam padding – ventisit only.
I have the return chain lifted and routed over the front wheel. To me it is a must to make the bike practical on paths and roads. In this configuration there is no problem with low speed turns – up to a point. Very tight turns still have chain/wheel interference, but so far that has been a rarity for me. Uphill really tight corners are probably better walked….heel strike will win one day! (Think – right angle corners on paths. You know the sort of stupid thing I mean.)
Some say it is an uncompromising race bike. I disagree. With the chain lifted it becomes quite a socially acceptable ride for normal roads and pathways. Yes, it has limitations in tyre size that would limit the road surface you might ride on (just like a road bike), the ride position might be too extreme for some at 20 degrees, and access into the cockpit takes some mild acrobatics. There is provision to fit a rack and panniers, but I haven’t, settling for a Bacchetta X-eyed bag instead. But as a bike to ride – wow!
It has become my #1 bike, commuting and all. Nuff said.
Update Dec 2021
All the above was written in 2015, and posted on the Brisbane Cyclist website. With the growth in social media that website eventually closed, and build blog was rescued and massaged into something that looks presentable.
December 2021, and the CHR has been in service for 6 years. Initially as a sport and commuter bike, but more recently the commuting bit was dropped with various job changes.
The bike has evolved somewhat too, the Bacchetta Brain Box was replaced by a slightly larger home made FRP tailbox, which in turn was replaced by an M5 large tailbox (that’s not supposed to fit the CHR but we made it…).
The wheels were replaced with a local builder’s 24 spoke aluminium offering, and have been very reliable. A PowerTap hub made it’s way into the rear wheel.
The brakes have been problematic, in as much as they worked but required high lever effort and didn’t inspire confidence on down hills. Not the calipers as such, but a mis-match between the leverage ratios needed between the caliper and brake lever. Several levers were tried, without success despite them being advertised as suitable for “road calipers”. The final solution was to modify a set of levers to have the cable pull ration the same as the caliper groupset brifters. The brakes are now as good as rim brakes get.
A much bigger issue was the failure of the seat, with the FRP cracking and pushing through where the rear supports sit. The seat was repaired, and at this stage a decision was made to completely re-do and re-think the bike fit. From original build, there was much more weight on the front wheel than rear and while it didn’t seem a problem I wasn’t altogether happy with it.
In summary the changes were:
Move seat back 70mm, and mount directly on the frames seat points. The front plate matched the seat well enough, but the rear needed a tapered wedge made to join the seat and frame. Made of wood, this has threaded inserts to attach to the frame, and the seat. These changes lowered the seat approx. 20mm, and set the angle at 20 degrees.
Fit short cranks, 150mm. This dramatically increased clearance between the front tyre and crank, partly compensated for the moving the seat back, and let the handlebars move forward (relative to my chest) for more cockpit room.
Refit the M5 tailbox, mounted a little higher up the seat for improved rear wheel clearance.
The end result is the front/rear weight distribution is pretty much 50/50 when I have my usual ride load on board, ie tools, water, spares etc. The ride position is now better than previous, even though I hadn’t had any complaints!
That is a magnificent read. Some great information here. I’ll use that advice as a rebuild another CHR after riding mine into a car, not my best choice. I also ran a return chain idler, much better in terms of practicality. And I ran a 451 front wheel to reduce the seat angle and maximise heel clearance. Still was a rocket and they are wonderful bikes to spend time on.
Thanks for this resource. Cheers.